English 


 |


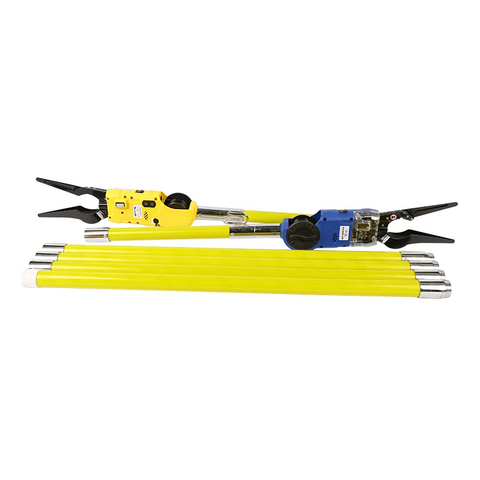
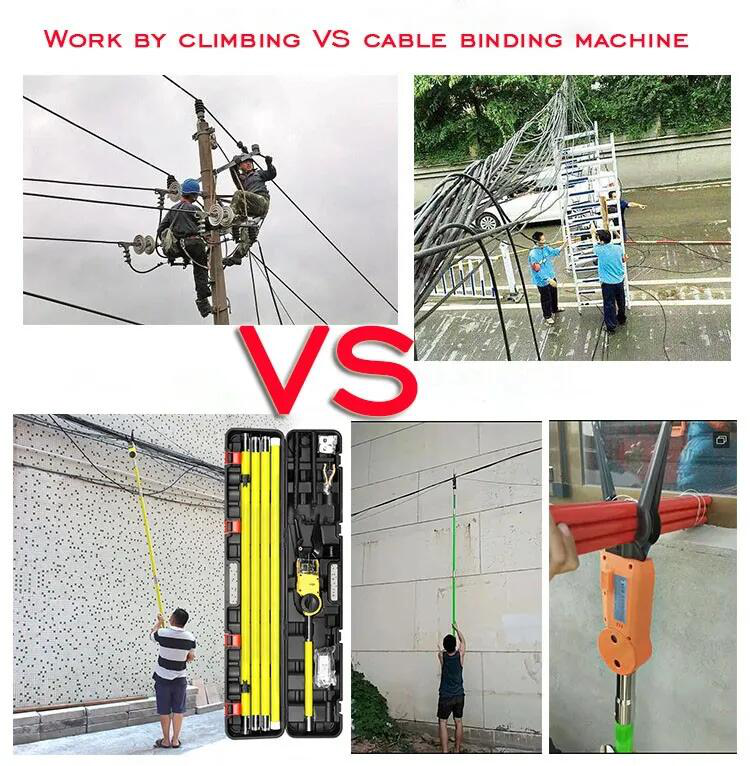
| 580A is a hand-held, free climbing and cable quick attached tool, with internal placement of components such as controllers. The tool could automatically complete all steps of cable strapping, and could be widely used in the field of communication engineering working at height, to replace traditional manual attached strapping cables. The machine is mainly composed of five parts: body, special coil, battery, remote control and hand-held lever. | |||||||||
580A
Technical parameters:
Product model: 580A
Weight: 9 KGS
Tying range: 5-58mm
Iron wire diameter: 0.85mm
Tying length/knot:700-750mm
Knot/battery: 1500 knots
Voltage: 12.8V
Tying time: 0.8s
Charging time: 1.5 h
Battery capacity:Battery capacity: 6600 mah .one battery can work more than 1500 times, about 3
km attached.
Insulating rod: It can insulate the voltage of 10 KV, it consist of glass fiber reinforced plastic
epoxy pipe. The length is1. 2 m.
Coated wire: 110m per roll, once tying length of 700-750mm once with attached to 2KM.
Remote control: The distance is 20m, it still effect through the tall wall.
Standard Accessories:
1pc of Cable tying machine 2pcs of battery
1pc of charger 2pcs of coated wire coil
1pc of Sharp Nose Pliers 2pcs of Allen Wrench
4pcs of insulating rod 2pcs of remote control
1pc of manual
Operation Instruction
I. Take out the insulator of the battery and charge the unused lithium battery for 1.5
hours before using the machine. While the charger green light is on and the red light
is off, the battery has been fully charged. Insert the battery into the relevant handle
position of machine. Turn on power switch, and the indicator light(red light) will on
with buzzer, which means the machine is on.
II. Rotate and remove the six-hole circular cover of the fixed wire plate in the middle
of the fuselage, In the power-on mode, Put our customized wire coil into the machine.
III. Take out and straighten the end of the wire (approx. 10-15cm), and slowly insert
the wire into the plastic mouth, until it is blocked. Put the wire coil cover back, and
lock the lock buckle.
Attention: the wire would fail to be sent if the end of the wire is not straightened.
IV. Hold the wire with two fingers and push it forward. Press the trigger, and send out
the wire.
Attention: keep your hands away from the jaw when tying
V. Take out the high suitable insulation rod, and connect with the battery insulation
Rod.
VI. 6.Lift the fuselage and select the right line for construction.
VII. Put all the cables that need to be bundled into the binding grooves.
VIII. The construction personnel press the remote control switch, and the attached
machine will to the automatic spin, hinge tightly and cutting off.
IX . Press the second operation after one operation, do not continue to operate many
times, in case of the two wire entangled together.
X. After you hear the machine beep for a long time, please restart the power and the
machine will restore to working condition.
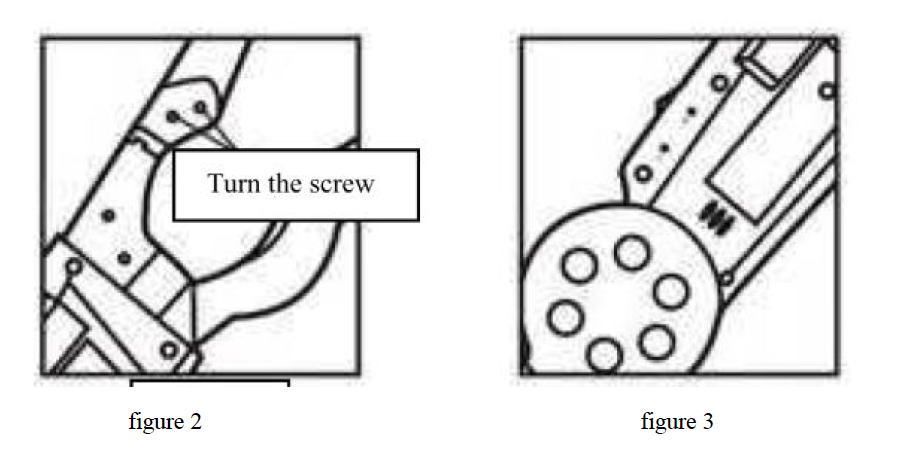
XI. The wire guiding block is quick-wear part, so it is need to be adjusted if necessary.
Loose the screw and adjust it to proper position(see figure2). The proper diameter of
the knot circle is 83-85mm
XII. Torque Adjusting(see figure 3). Adjust torque when the knot tightness is
improper. Press the “+” button to increase the torque when the knot is loose ( the
factory setting is 10th level). The buzzer sounds according to the related level, e.g
there are 4 buzzer sounds when the torque is on 4th level. Press “-” button when the
knot is too tight(the knot is easy to be broken).
Trouble Shooting
Problems | Causes | Solutions |
Turn on button doesn't work and machine cannot be opened | 1.The battery is over-used or damaged 2.Failures of motor or circuit board 3.The battery is not insert or inserted tightly | Change battery or install battery again after it is fully charged. If still failed, send the machine to professional maintenance personal for repair |
Motor works, but no wire comes out | 1. Without wire coil or install non-designated wire coil 2. The end of the wire is not straightened | 1. Insert designated wire coil 2. Straighten the end of the wire |
The machine doesn't work | 1. Low battery 2. The gearing is jammed 3. Failures of motor or circuit board | 1. Fully charged the battery 2. Open the gearing and take out the stuff |
The wire fail to be cut off | Wear of the wire cut blade or wire guiding block | Change the wire cut blade or wire guiding block |
Wire shifting: the wire is not in the right place of the jaw, which leads to tying failure | The jaw is blocked, which will cause intervention of wire track. As a result, the wire does not come out in the right place. | Adjust the tying angle and clean the obstacles in the wire track, so as to eliminate all interference. |
Charger indicator light off | The charger failures | Replace it with a new charger |
Buzzer Alarm | 1. the machine does not be used after turn on the power switch over one minuter 2. Run out of the battery. | 1.Switch off and restart the machine 2.Fully charged the battery or change the battery |
Technical parameters:
Product model: 580A
Weight: 9 KGS
Tying range: 5-58mm
Iron wire diameter: 0.85mm
Tying length/knot:700-750mm
Knot/battery: 1500 knots
Voltage: 12.8V
Tying time: 0.8s
Charging time: 1.5 h
Battery capacity:Battery capacity: 6600 mah .one battery can work more than 1500 times, about 3
km attached.
Insulating rod: It can insulate the voltage of 10 KV, it consist of glass fiber reinforced plastic
epoxy pipe. The length is1. 2 m.
Coated wire: 110m per roll, once tying length of 700-750mm once with attached to 2KM.
Remote control: The distance is 20m, it still effect through the tall wall.
Standard Accessories:
1pc of Cable tying machine 2pcs of battery
1pc of charger 2pcs of coated wire coil
1pc of Sharp Nose Pliers 2pcs of Allen Wrench
4pcs of insulating rod 2pcs of remote control
1pc of manual
Operation Instruction
I. Take out the insulator of the battery and charge the unused lithium battery for 1.5
hours before using the machine. While the charger green light is on and the red light
is off, the battery has been fully charged. Insert the battery into the relevant handle
position of machine. Turn on power switch, and the indicator light(red light) will on
with buzzer, which means the machine is on.
II. Rotate and remove the six-hole circular cover of the fixed wire plate in the middle
of the fuselage, In the power-on mode, Put our customized wire coil into the machine.
III. Take out and straighten the end of the wire (approx. 10-15cm), and slowly insert
the wire into the plastic mouth, until it is blocked. Put the wire coil cover back, and
lock the lock buckle.
Attention: the wire would fail to be sent if the end of the wire is not straightened.
IV. Hold the wire with two fingers and push it forward. Press the trigger, and send out
the wire.
Attention: keep your hands away from the jaw when tying
V. Take out the high suitable insulation rod, and connect with the battery insulation
Rod.
VI. 6.Lift the fuselage and select the right line for construction.
VII. Put all the cables that need to be bundled into the binding grooves.
VIII. The construction personnel press the remote control switch, and the attached
machine will to the automatic spin, hinge tightly and cutting off.
IX . Press the second operation after one operation, do not continue to operate many
times, in case of the two wire entangled together.
X. After you hear the machine beep for a long time, please restart the power and the
machine will restore to working condition.
XI. The wire guiding block is quick-wear part, so it is need to be adjusted if necessary.
Loose the screw and adjust it to proper position(see figure2). The proper diameter of
the knot circle is 83-85mm
XII. Torque Adjusting(see figure 3). Adjust torque when the knot tightness is
improper. Press the “+” button to increase the torque when the knot is loose ( the
factory setting is 10th level). The buzzer sounds according to the related level, e.g
there are 4 buzzer sounds when the torque is on 4th level. Press “-” button when the
knot is too tight(the knot is easy to be broken).
Trouble Shooting
Problems | Causes | Solutions |
Turn on button doesn't work and machine cannot be opened | 1.The battery is over-used or damaged 2.Failures of motor or circuit board 3.The battery is not insert or inserted tightly | Change battery or install battery again after it is fully charged. If still failed, send the machine to professional maintenance personal for repair |
Motor works, but no wire comes out | 1. Without wire coil or install non-designated wire coil 2. The end of the wire is not straightened | 1. Insert designated wire coil 2. Straighten the end of the wire |
The machine doesn't work | 1. Low battery 2. The gearing is jammed 3. Failures of motor or circuit board | 1. Fully charged the battery 2. Open the gearing and take out the stuff |
The wire fail to be cut off | Wear of the wire cut blade or wire guiding block | Change the wire cut blade or wire guiding block |
Wire shifting: the wire is not in the right place of the jaw, which leads to tying failure | The jaw is blocked, which will cause intervention of wire track. As a result, the wire does not come out in the right place. | Adjust the tying angle and clean the obstacles in the wire track, so as to eliminate all interference. |
Charger indicator light off | The charger failures | Replace it with a new charger |
Buzzer Alarm | 1. the machine does not be used after turn on the power switch over one minuter 2. Run out of the battery. | 1.Switch off and restart the machine 2.Fully charged the battery or change the battery |